Globus Connect Personal – Installation & Data Transfer Guide
Globus Connect Personal (GCP) lets you turn your own workstation or desktop (Windows, macOS, or Linux) into a Globus collection, so you can move data to and from institutional (e.g., KISTI GSDC) storage using the Globus Web App. 
This guide shows how to:
-
Install GCP on Windows, macOS, and Linux
-
Create a personal collection on your computer
-
Make local folders accessible
-
Transfer files between your PC and a remote Globus collection
Overview & Concepts
- Globus Web App – Web interface at https://app.globus.org used to manage collections and transfers.
- Collection – A named location (endpoint) that Globus can access. Your workstation with GCP installed becomes a personal collection.
- Globus Connect Personal (GCP) – Lightweight client that runs under your user account and connects your local filesystem to Globus. Available for:
- macOS 10.13+
- Currently supported Windows versions
- Common x86 Linux distributions
GCP is free to install and use for users at non‑profit research and education institutions.
Prerequisites
Before installation, you should have:
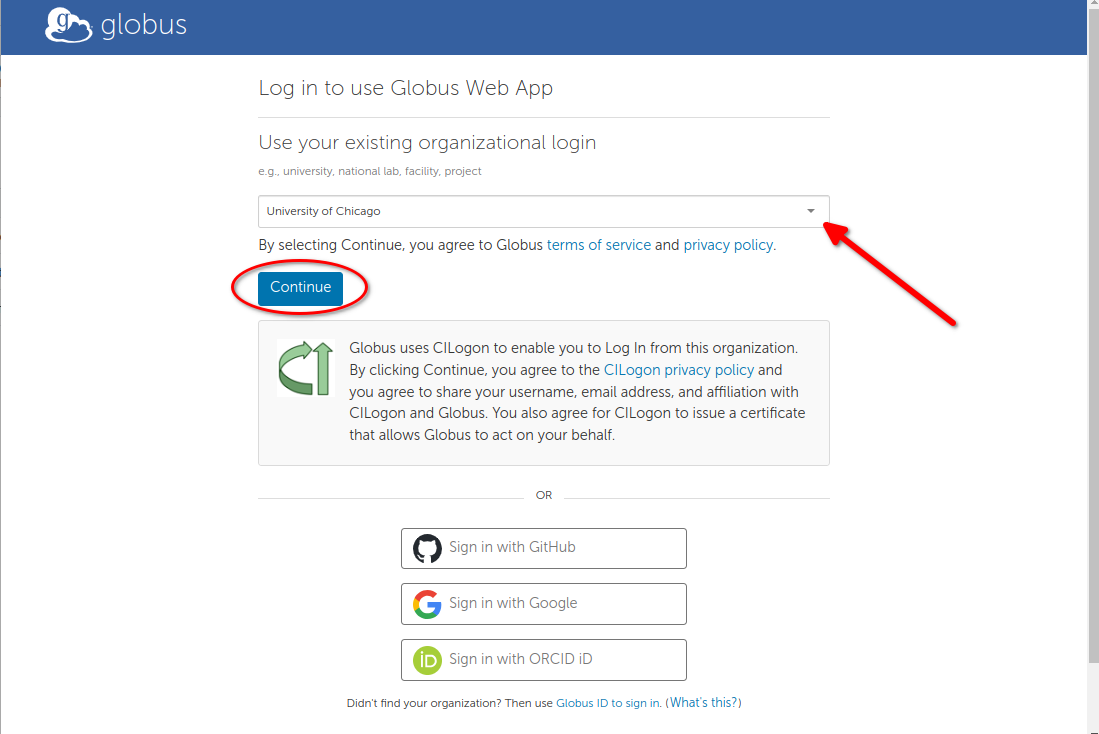
1. A Globus account/identity
You can log in https://app.globus.org with:
- Your institution (university / lab) single-sign-on (SSO)
- Or Google, ORCID, GitHub, or a Globus ID account
2. A remote Globus collection to transfer to/from
- Typically an institutional (e.g., KISTI GSDC) collection on a data computing cluster or storage system.
- KISTI GSDC collection name for TEM :
TEM_Collection@KISTI-GSDC
3. Permissions on your own computer
- Ability to install software in some directory you can write to (does not have to be system-wide Program Files, etc.).
Install Globus Connect Personal on Windows
1. Download
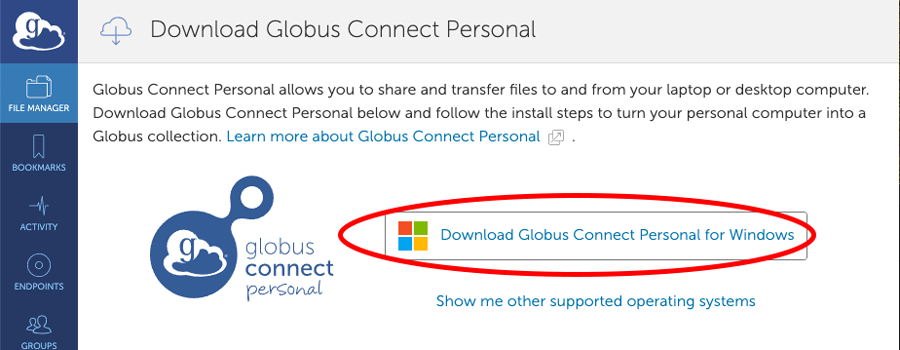
- Visit the Globus Connect Personal page: https://www.globus.org/globus-connect-personal.
- Click Install now for Windows (or follow your institution’s documentation link).
- On the download link, click Download Globus Connect Personal for Windows.
2. Run the Installer
- Double‑click the downloaded installer (
GlobusConnectPersonal-x.y.z.exe). - If you are the only user and have administrator rights, you can accept the default install location and click Install.
- If you don’t have admin privileges or want a different location:
- Click Browse
- Choose a directory you can write to (e.g.,
C:\Users\<you>\Apps\GlobusConnectPersonal) - Continue with installation.
After installation, GCP launches automatically and shows a Log In button.
Install Globus Connect Personal on macOS
1. Download
- Go to https://www.globus.org/globus-connect-personal.
- Under Globus Connect Personal for Mac, click Install now.
- On the download link, click Download Globus Connect Personal for Mac to get a
.dmgfile.

2. Install the App
- Open the downloaded
.dmgfile. - Drag Globus Connect Personal into the Applications folder.
- Open Finder → Applications, then double‑click Globus Connect Personal to launch it.
GCP will show a Log In button for the first-time setup.
Install Globus Connect Personal on Linux
1. GUI Prerequisite (Optional)
If you want to use the graphical interface, install Tcl/Tk:
# Ubuntu / Debian / Linux Mint
sudo apt-get install tk tcllib

# Fedora / CentOS / RHEL
sudo yum install tk tcllib

# openSUSE
sudo zypper install tk tcllib
Without Tcl/Tk you can still use GCP in command‑line mode only.
2. Download & Extract
You can either use a browser via the install page or download directly:
# Download latest release
wget https://downloads.globus.org/globus-connect-personal/linux/stable/globusconnectpersonal-latest.tgz

# Extract
tar xzf globusconnectpersonal-latest.tgz

# Change into the extracted directory (replace x.y.z with the version)
cd globusconnectpersonal-x.y.z
3. First Launch
Run:
The first run walks you through setup (GUI or text prompts depending on environment).
Later, you can start it in the background:
First-Time Setup & Collection Creation
These steps are similar on all platforms.
-
Click “Log In” in the GCP window
-
GCP opens your default browser to complete authentication.
-
Authenticate with Globus
-
Choose your organization or another identity provider, and log in.
-
If asked, consent to allow GCP/Globus to use your identity.
-
Grant GCP permissions
-
You’ll see a consent page requesting permission for GCP to create and manage a personal collection on your behalf.
-
Click Allow.
-
Configure your collection
You’ll be asked to provide:
- Collection display name – e.g.,
MyWorkStation,Lab-PC-01, or something your users will recognize. - Description (optional).
-
Default directory – typically your home directory.
-
Finish setup
-
After setup completes, GCP starts running and connects to the Globus service.
- You’ll see a Globus icon:
- Windows: in the system tray / taskbar.
- macOS: in the menu bar (top of the screen).
- Linux: GUI status window or CLI messages; you can check status via
./globusconnectpersonal -status.
At this point, your PC is a Globus collection and can be used in the Web App.
Make Local Folders Accessible for Transfer
By default, only a limited part of your filesystem (typically your home directory) is accessible to Globus. To upload/download to other paths (e.g., HDD/SSD external drives), you must explicitly allow them.
Security tip: Only expose folders that actually need to be accessed via Globus.
1. Windows – Accessible Folders
-
Right‑click the Globus icon in the taskbar and choose Options….
-
In the Access tab:
- You’ll see your home directory listed by default.
- Click + to add more folders (e.g.,
D:\data\project1). - Optionally tick Sharable if your institution has a Globus subscription that allows creating guest collections.
-
Path syntax from Globus:
/~/maps to your Windows home directory (e.g.,C:\Users\yourname)./C/path/to/dircorresponds toC:\path\to\dirand so on.
2. macOS – Accessible Directories
-
Click the Globus icon in the menu bar → Preferences….
-
In Access:
- Your home directory (e.g.,
/Users/yourname) is allowed by default. - Click + to add additional directories.
- You can choose whether each directory is sharable (requires a subscription for sharing).
- Your home directory (e.g.,
3. Linux – Accessible Directories (config file)
On Linux, you can manage accessible paths via the GUI (if Tcl/Tk is installed) or via the config file:
- Paths and permissions are stored in
~/.globusonline/lta/config-pathsas CSV:
SHARING_FLAG:1allow sharing,0disableR/W_FLAG:1read/write,0read‑only
After editing config-paths, restart GCP:
Transfer Data with the Globus Web App
Once GCP is installed, running, and configured, users can transfer files using any browser.
For more detailed step-by-step guides for file transfer, please refer to the following: https://docs.globus.org/guides/tutorials/manage-files/transfer-files/
1. Log In to Globus
-
Go to https://app.globus.org.
-
Log in with your institution or other (Google, ORCID, GitHub, or a Globus ID account) identity.
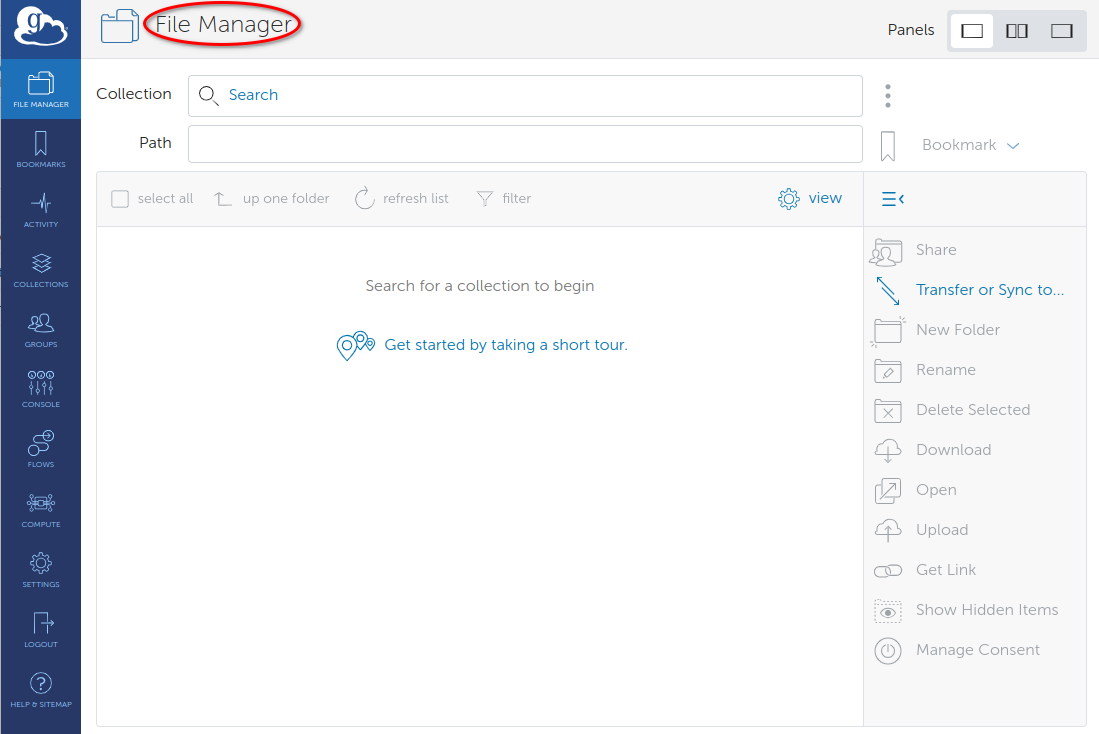
2. Open the File Manager
After login, you land on the File Manager page.
3. Select Your Personal Collection
-
On left panel, in the Collection field, type the name you gave your PC’s collection (e.g.,
MyWorkStation). -
Select it from the list; Globus connects and shows the default path (e.g.,
/~/).
4. Select the Remote Collection
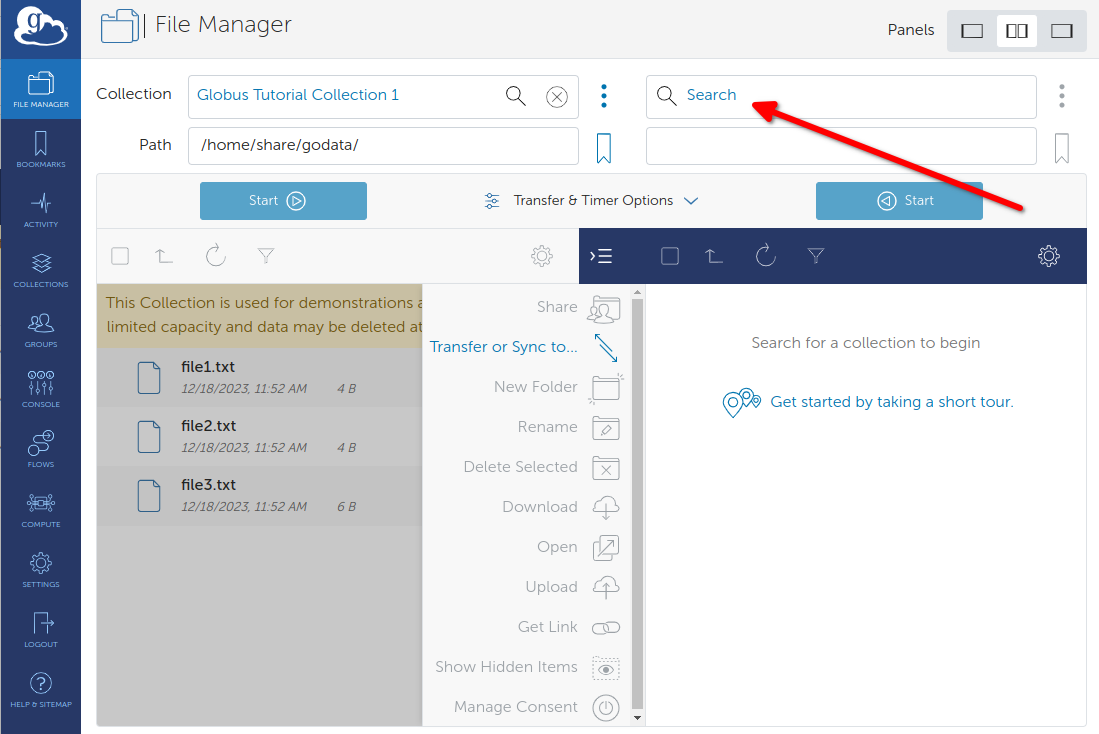
You can run File Manager in two‑panel mode:
- Click Transfer or Sync to… on the right side to open a second panel.
- In the right panel’s Collection field, search for your remote collection (e.g., TEM_Collection@KISTI-GSDC).
- If additional authentication is required, you will be redirected to the GSDC TEM OIDC server, enter user ID and your password(+OTP) on that screen to complete the authentication.
- Navigate to the directory you’re allowed to read/write.
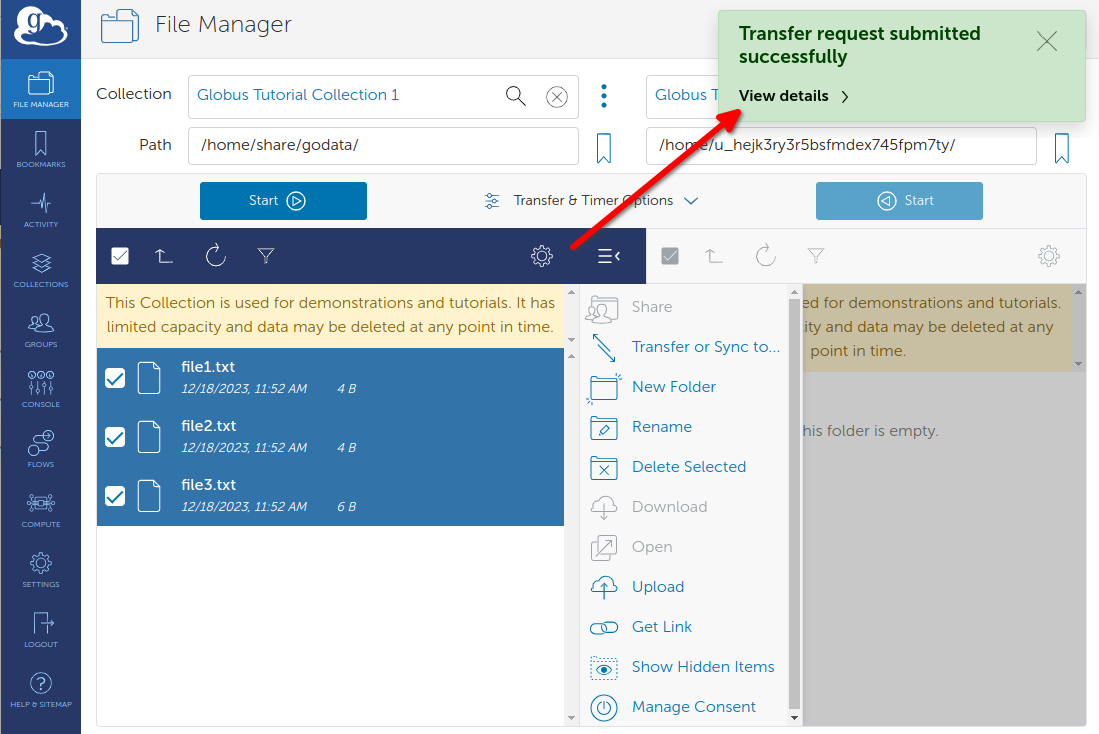
5. Start a Transfer
To upload from your PC to the remote system:
-
Left panel: your personal collection (GCP)
-
Navigate to the folder and select the files/directories you want to transfer.
-
Right panel: remote collection (HPC Storage like KISTI-GSDC)
-
TEM_Collection@KISTI-GSDC -
Navigate to the destination directory.
-
Click Start above the panel that represents the destination (depends on UI layout).
To download from the remote collection to your PC, reverse which side is source/destination.
Globus will:
- Queue the transfer
- Automatically retry on network glitches
- Verify file integrity with checksums by default.
6. Monitor Transfer Status
-
Click Activity in the left navigation to see current and past transfers.
-
Click a transfer’s details icon to see per‑file status and error messages if any.
-
You will also receive email notifications when transfers finish or fail.
Even if you close your browser or log out, the transfer continues on the Globus service side.
Tips & Troubleshooting
1. Common Issues
-
“Path not allowed” or missing folders in File Manager
- Ensure the folder is added to Accessible Folders/Directories (Windows/macOS) or
config-paths(Linux). - Confirm your OS user has permission to read/write that folder locally.
- Ensure the folder is added to Accessible Folders/Directories (Windows/macOS) or
-
Install permission errors (e.g., can’t write to
C:\Program Files)- Install into a directory you own (e.g., your home directory).
-
GCP icon shows “Not Connected”
- A firewall or network rule may be blocking connections to the Globus service.
- Try a different network (home vs campus VPN) or contact your IT staff with the Globus firewall requirements documentation.
-
Browser login cannot be started from GCP
- Some security tools block launching a browser. In that case, you can use a GCP Setup Key as described in the troubleshooting guide.
2. Advanced (Windows) – Very Long Paths
If you are working with extremely deep directory structures or very long filenames on Windows, you may need to enable long path support in the OS registry for GCP to handle paths up to 4096 characters.
This change requires admin rights and a reboot; see the following Windows GCP install documentation for details.
https://docs.globus.org/globus-connect-personal/install/windows/#enable_long_path_support
3. Globus Official Help
-
Main GCP docs (Windows/macOS/Linux) : detailed installation & configuration. https://docs.globus.org/globus-connect-personal/#install
-
How to Log In and Transfer Files tutorial : step‑by‑step File Manager walkthrough. https://docs.globus.org/guides/tutorials/manage-files/transfer-files/
-
GCP Troubleshooting Guide : in‑depth help for install, firewall, and permission problems. https://docs.globus.org/globus-connect-personal/#troubleshooting_configuration